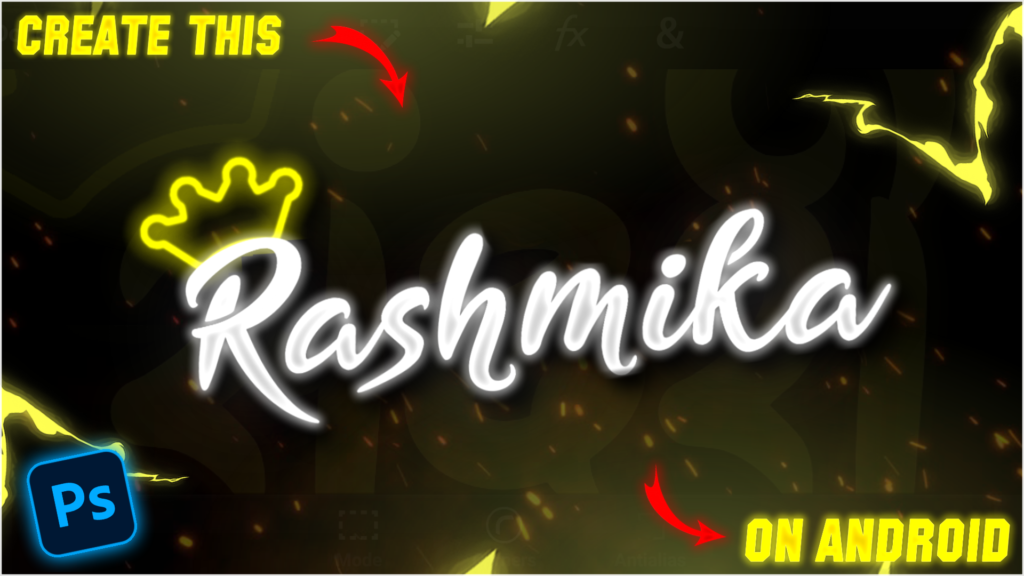
Many of you are always asking me about how I create my text PNG which I use in my videos. Let’s reveal this in today’s blog post. Hello guys, I am RC creation and I welcome you all into another interesting blog post. In this blog post I am gonna show you how to create glowing text PNG in the PS CC app. This type of PNG is very attractive and attracts the viewers to watch your video. You can also easily create your own name text PNG and for that you just need to be with us till the end of this blog post. So without wasting any time let’s get started.
STEP 1
You need the two editing applications to create glowing text PNG. Let’s start with the pixel lab app which is the first application of our list. Pixel lab is a text editing app and we need this app to create a name text PNG. Pixel lab is also a very good application and you can use this to edit various types of text. So download it first from the download link available below. Then install this app on your phone.
STEP 2
The interface of the pixel lab app is very simple and you can easily get familiar with this app’s interface. This interface also helps you to create a good text PNG even if you are using this app for the very first time. Now to write your name double click on the new text option. Write your name here and click on the ok option. In this manner you can write your name text PNG. If you need the Clear View of your name text PNG then don’t forget to select a black background. To make your background completely black, click on the third option and then choose the background colour option. By this process you can make your background completely black.
STEP 3
Once you create your name text PNG, it looks quite normal until you can’t apply a fancy font to your name text PNG. To do this, you also need some fancy fonts. Don’t worry, if you don’t have fancy fonts. I will provide you with some free fancy fonts. Actually I have provided a small pack of fancy fonts at the end of this paragraph. The fonts are present in the zip file format. So download it first and to use these fonts you need to unzip this file. You can easily unzip this file by using any app available on Play Store or App Store.
STEP 4
Choose any one of the fancy fonts from the font pack and apply it to your name text PNG. Now your text PNG might be looking quite attractive than the normal version. We will make it more attractive in the PS CC app later. Before moving towards the PS CC app, you need to save your name text PNG to your gallery. To save your text PNG click on the save option then change the dimension to the Ultra settings and then save it. Your text PNG gets saved in good quality if you save it on Ultra setting. Text quality is very important to create a good glowing text PNG.
STEP 5
Now the PS CC app comes into play to make glowing text PNG. Basically PS CC is a mix kind of editing app. Means you can retouch the photos and make a good quality text PNG in this app. I will provide the download link for the PS CC app below. So download this app and install it on your phone. Because our next editing process will be done on this app.
STEP 6
To create glowing text PNG open the PS CC app. You can use this app in both ways vertically and horizontally. I basically prefer that you can use it in a horizontal direction. In this way you can easily control and access the process that is going through the app. The interface of this app is quite different and quite difficult from the pixel lab app. But don’t get confused. I have explained this process in a very simple manner so it will be very easy for you to use this app.
STEP 7
Create a blank project in the PS CC app. Now Import the text PNG which you have just saved from the pixel lab app. To add the name text PNG click on the plus icon then select the photo layer, photo library and add the text PNG from the respective folder. Resize and adjust this text PNG with the help of two fingers. Now select the pixels of your name text PNG. Click on the first option and then choose the select pixel option.
STEP 8
Apply the gradient of fent yellow and fent orange colour after selecting the pixel of text PNG. Click on the 4th option and select the gradient option to apply the colour gradient to your text. You can adjust the gradient colour according to your need. After that select the pixel of your text PNG again and this time select the colour and feel option to apply the stroke to your text PNG. Remember that you have to apply the very faint colour to your stroke. Now to make your text glowing, apply the gaussian blur effect to your text.
STEP 9
You can add Crown PNG to make your name text PNG more attractive. To add the Crown PNG click on the plus icon and select photo layer option. Apply the glow effect to make your crown PNG glow. I will provide you with the download link of this Crown text PNG below. So you can download this Crown text PNG from that link. Adjust the size and position of your crown PNG with the help of two fingers.
STEP 10
After following all the steps mentioned above your text PNG is ready to save. To save the text PNG, click the share button and save your text. If you face any problems while making this text PNG, then you can refer to my youtube video. Link is given below.
If you have any problems about today’s blog then feel free to share with us by using the comment box. We will try to solve your queries as early as possible. Thank you for your valuable time.


1 Comment
Ashutosh Dhaygude · August 28, 2021 at 1:07 pm
Ps apk download होत नाही